Full Stack Web3 開発ガイド - DEV コミュニティ
Next.js、Polygon、Solidity、The Graph、IPFS、Hardhat を使用したフルスタックweb3アプリの作成
このチュートリアルのビデオはこちらで視聴できます。
この詳細なチュートリアルでは、フルスタックweb3アプリを構築するためのツール、プロトコル、フレームワークを学び、最も重要なのは、将来自分のアイデアを構築するための基盤をどのようにまとめるかを学びます。
このアプリのコードベースはこちらにあります。
メインネットワークとしてデプロイする予定のネットワークは Polygon です。私がPolygonを選んだ理由は、その低いトランザクションコスト、高速なブロックタイム、そして現在のネットワークの採用状況にあります。
とはいえ、私たちは Ethereum Virtual Machine(EVM)上で構築するため、これらのスキルをEthereum、Celo、Avalancheなど、他の多くのブロックチェーンネットワーク向けにも応用することができます。
構築するアプリは、フルスタックのブログと、コンテンツ管理システム(CMS)です。つまり、公開され、公共の、再利用可能なバックエンドを持つことになります。
このチュートリアルを終了する頃には、現代のweb3スタックの最も重要な要素と、パフォーマントでスケーラブルなフルスタックの分散型ブロックチェーンアプリケーションの構築方法を十分に理解しているでしょう。
これは私の「フルスタック」web3シリーズの第4のガイドです。こちらもぜひチェックしてみてください:
- フルスタック以太開発完全ガイド
- PolygonでのEthereumフルスタックNFTマーケットプレイスの構築
- React、Anchor、Rust、Phantom を使ったフルスタック Solana 開発ガイド
web3スタック
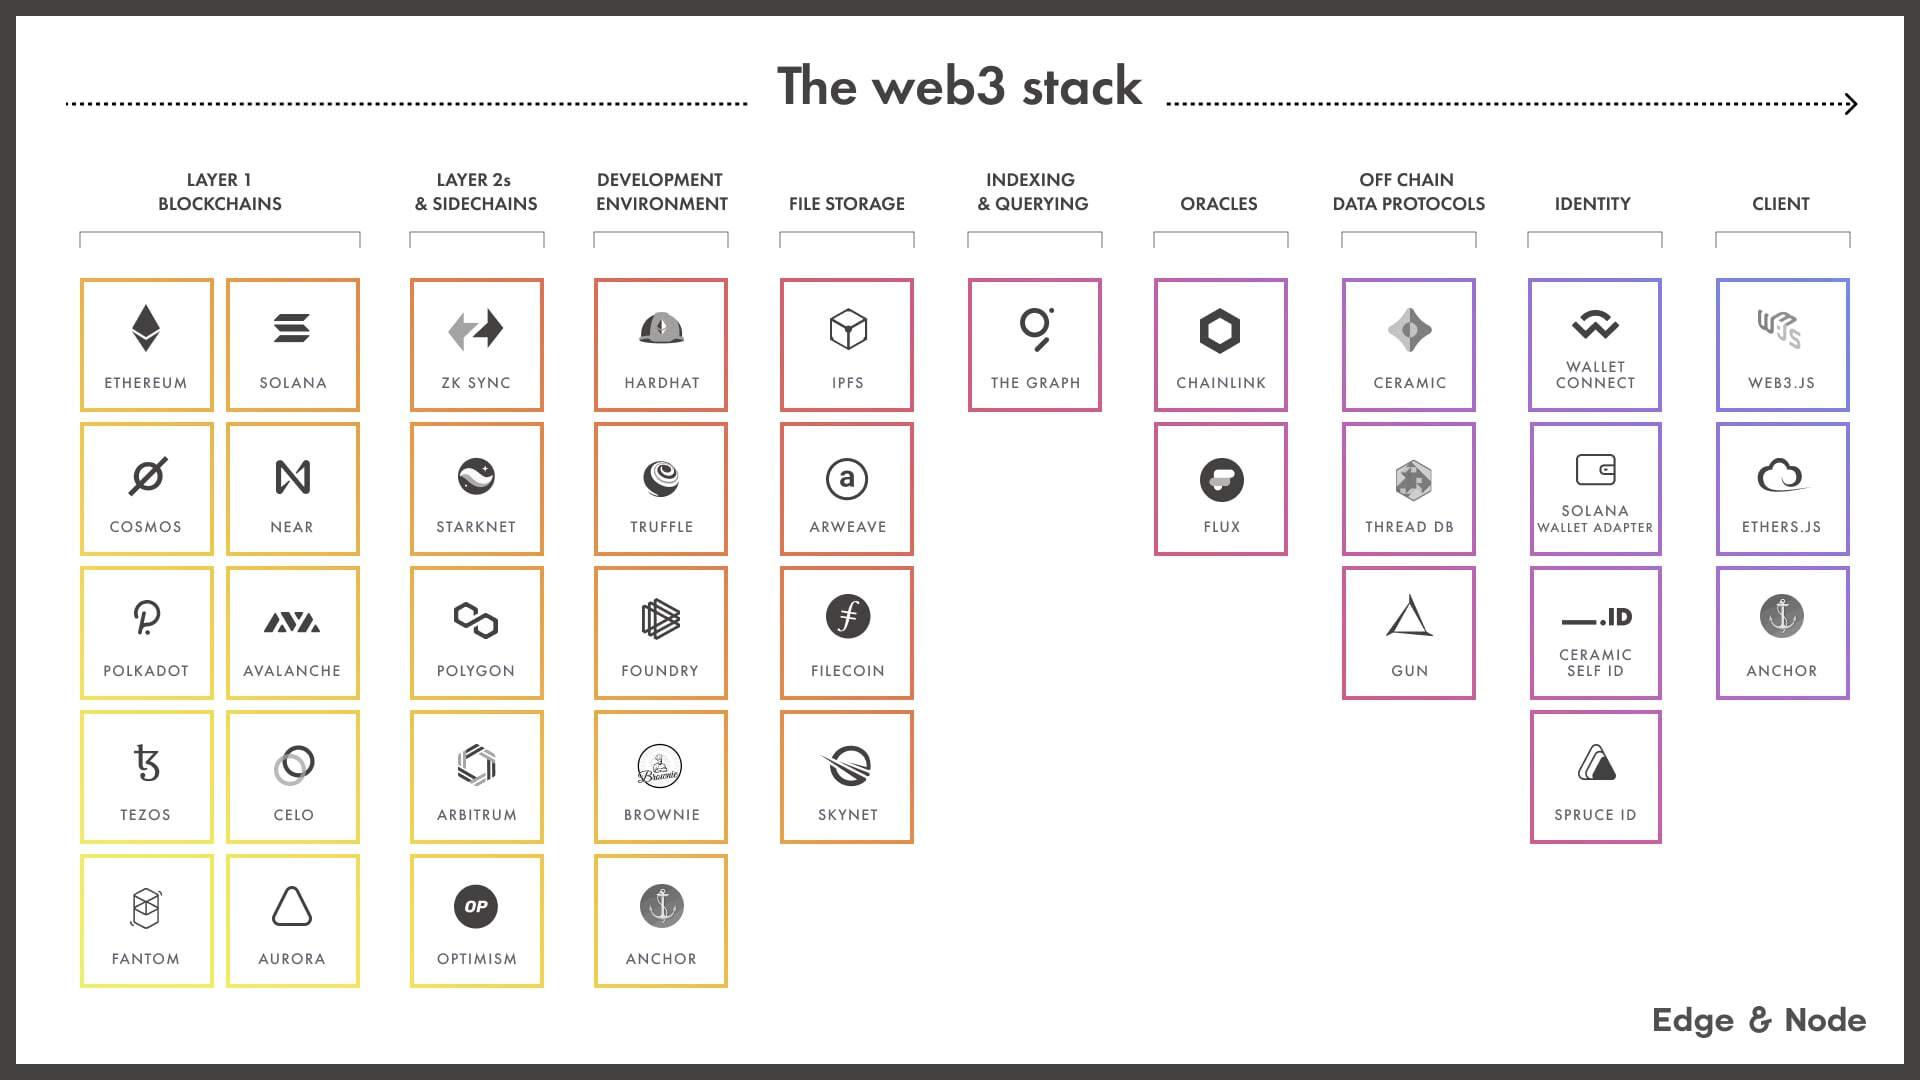
web3スタックを定義するで、私はEdge&Nodeのチームで過去一年間行われた研究および私自身の経験を合わせて、開発者の視点からの現在のweb3技術スタックについて私の解釈を書きました。
このアプリケーションでは、このスタックの一部を使用します:
- ブロックチェーン - Polygon(省略可能なRPCプロバイダー付き)
- Ethereum開発環境 - Hardhat
- フロントエンドフレームワーク - Next.js & React
- Ethereumウェブクライアントライブラリ - Ethers.js
- ファイルストレージ - IPFS
- 索引付けとクエリ - The Graph Protocol
これらの構築ブロックを使用して、多くのタイプのアプリケーションを構築することができるので、このチュートリアルの目標は、それぞれがどのように機能し、どのようにフィットするかを示すことです。
始めましょう!
前提条件
- ローカルマシンにNode.jsがインストールされている
- ブラウザにMetaMask Chrome拡張機能がインストールされている
プロジェクトの設定
ここで、アプリケーションのボイラープレートを作成し、必要な依存関係をすべてインストールし、プロジェクトを設定します。
コードは何が起きているかを理解するためにコメント付きで記述されており、チュートリアル全体を通していくつかの内容について説明します。
まず、新しいNext.jsアプリケーションを作成し、新しいディレクトリに移動します。
npx create-next-app web3-blog

cd web3-blog
全画面モードに入る
次に、新しいディレクトリに移動し、npm、yarn、またはpnpmを使用して次の依存関係をインストールします。
npm install ethers hardhat @nomiclabs/hardhat-waffle \
ethereum-waffle chai @nomiclabs/hardhat-ethers \
web3modal @walletconnect/web3-provider \
easymde react-markdown react-simplemde-editor \
ipfs-http-client @emotion/css @openzeppelin/contracts
全画面モードに入る
これらの依存関係の概要:
hardhat - Ethereum開発環境
web3modal - ユーザーがウォレットをアプリに接続するのが簡単になるライブラリ
react-markdownおよびsimplemde - CMS用のマークダウンエディターとマークダウンレンダラー
@emotion/css - 素晴らしいCSS in JSライブラリ
@openzeppelin/contracts - 便利なスマートコントラクト標準および機能のオープンソース実装
次に、ローカルのスマートコントラクト開発環境を初期化します。
npx hardhat

? What do you want to do? Create a basic sample project
? Hardhat project root: <Choose default path>
全画面モードに入る
README.mdに関するエラーが発生したら、README.mdを削除してもう一度
npx hardhatを実行してください。
これにより、基本的なSolidity開発環境が作成されます。新しいファイルやフォルダがいくつか作成されるはずです。これにはcontracts、scripts、test、hardhat.config.jsが含まれます。
次に、hardhat.config.jsでハードハット設定を更新しましょう。
以下のコードでこのファイルを更新します:
require("@nomiclabs/hardhat-waffle");

module.exports = {
  solidity: "0.8.4",
  networks: {
    hardhat: {
      chainId: 1337
    },
    // mumbai: {
    //   url: "https://rpc-mumbai.matic.today",
    //   accounts: [process.env.pk]
    // },
    // polygon: {
    //   url: "https://polygon-rpc.com/",
    //   accounts: [process.env.pk]
    // }
  }
};
全画面モードに入る
ここで、ローカルのハードハット開発環境を設定し、PolygonメインネットとMumbaiテストネット環境を(コメントアウトされましたが)セットアップしました。これらは後ほどPolygonにデプロイするために使用します。
次に、CMS用のマークダウンエディターをスタイルするために必要な、いくつかの基本的なグローバルCSSを追加しましょう。
styles/globals.cssを開いて、以下のコードを既存のCSSの下に追加します:
.EasyMDEContainer .editor-toolbar {
  border: none;
}

.EasyMDEContainer .CodeMirror {
  border: none !important;
  background: none;
}

.editor-preview {
  background-color: white !important;
}

.CodeMirror .cm-spell-error:not(.cm-url):not(.cm-comment):not(.cm-tag):not(.cm-word) {
  background-color: transparent !important;
}

pre {
  padding: 20px;
  background-color: #efefef;
}

blockquote {
  border-left: 5px solid #ddd;
  padding-left: 20px;
  margin-left: 0px;
}
全画面モードに入る
次に、いくつかのSVGファイルをアプリの画像用に作成します。一つはロゴ用、もう一つは矢印ボタン用です。
パブリックフォルダに**logo.svg** と right-arrow.svg を作成し、それぞれにリンクされたSVGコードをコピーして貼り付けます。
スマートコントラクト
次に、ブログとCMSを動力とするスマートコントラクトを作成しましょう。
contractsフォルダにBlog.solという新しいファイルを作成します。
次に、以下のコードを追加します:
// contracts/Blog.sol
//SPDX-License-Identifier: Unlicense
pragma solidity ^0.8.0;

import "hardhat/console.sol";
import "@openzeppelin/contracts/utils/Counters.sol";

contract Blog {
    string public name;
    address public owner;

    using Counters for Counters.Counter;
    Counters.Counter private _postIds;

    struct Post {
      uint id;
      string title;
      string content;
      bool published;
    }
    /* Mappings can be seen as hash tables */
    /* Here we create lookups for posts by id and posts by ipfs hash */
    mapping(uint => Post) private idToPost;
    mapping(string => Post) private hashToPost;

    /* Events facilitate communication between smart contracts and their user interfaces */
    /* i.e., we can create listeners for events in the client and also use them in The Graph */
    event PostCreated(uint id, string title, string hash);
    event PostUpdated(uint id, string title, string hash, bool published);

    /* When the blog is deployed, give it a name */
    /* Also set the creator as the owner of the contract */
    constructor(string memory _name) {
        console.log("Deploying Blog with name:", _name);
        name = _name;
        owner = msg.sender;
    }

    /* Updates the blog name */
    function updateName(string memory _name) public {
        name = _name;
    }

    /* Transfers ownership of the contract to another address */
    function transferOwnership(address newOwner) public onlyOwner {
        owner = newOwner;
    }

    /* Fetches an individual post by the content hash */
    function fetchPost(string memory hash) public view returns(Post memory){
      return hashToPost[hash];
    }

    /* Creates a new post */
    function createPost(string memory title, string memory hash) public onlyOwner {
        _postIds.increment();
        uint postId = _postIds.current();
        Post storage post = idToPost[postId];
        post.id = postId;
        post.title = title;
        post.published = true;
        post.content = hash;
        hashToPost[hash] = post;
        emit PostCreated(postId, title, hash);
    }

    /* Updates an existing post */
    function updatePost(uint postId, string memory title, string memory hash, bool published) public onlyOwner {
        Post storage post =  idToPost[postId];
        post.title = title;
        post.published = published;
        post.content = hash;
        idToPost[postId] = post;
        hashToPost[hash] = post;
        emit PostUpdated(post.id, title, hash, published);
    }

    /* Fetches all posts */
    function fetchPosts() public view returns (Post[] memory) {
        uint itemCount = _postIds.current();

        Post[] memory posts = new Post[](itemCount);
        for (uint i = 0; i < itemCount; i++) {
            uint currentId = i + 1;
            Post storage currentItem = idToPost[currentId];
            posts[i] = currentItem;
        }
        return posts;
    }

    /* This modifier means only the contract owner can */
    /* invoke the function */
    modifier onlyOwner() {
      require(msg.sender == owner);
    _;
  }
}
全画面モードに入る
このコントラクトによって、オーナーはポストを作成および編集することができ、どなたでもポストを取得することができます。
スマートコントラクトを許諾なしで行うためには、
onlyOwner修飾子を削除し、ポストをオーナー別に索引付けおよびクエリするためにThe Graphを使用します。
次に、最も重要な機能についてテストを書こうと思います。
これには、test/sample-test.jsを開いて、以下のコードで更新してください:
const { expect } = require("chai")
const { ethers } = require("hardhat")

describe("Blog", async function () {
  it("Should create a post", async function () {
    const Blog = await ethers.getContractFactory("Blog")
    const blog = await Blog.deploy("My blog")
    await blog.deployed()
    await blog.createPost("My first post", "12345")

    const posts = await blog.fetchPosts()
    expect(posts[0].title).to.equal("My first post")
  })

  it("Should edit a post", async function () {
    const Blog = await ethers.getContractFactory("Blog")
    const blog = await Blog.deploy("My blog")
    await blog.deployed()
    await blog.createPost("My Second post", "12345")

    await blog.updatePost(1, "My updated post", "23456", true)

    posts = await blog.fetchPosts()
    expect(posts[0].title).to.equal("My updated post")
  })

  it("Should add update the name", async function () {
    const Blog = await ethers.getContractFactory("Blog")
    const blog = await Blog.deploy("My blog")
    await blog.deployed()

    expect(await blog.name()).to.equal("My blog")
    await blog.updateName('My new blog')
    expect(await blog.name()).to.equal("My new blog")
  })
})
全
こちらの記事はdev.toの良い記事を日本人向けに翻訳しています。
https://dev.to/edge-and-node/the-complete-guide-to-full-stack-web3-development-4g74